Sunday, October 2, 2016

Capsule Wardrobe

Have you heard of a capsule wardrobe? It's an idea that's all over Pinterest if you've looked recently! Basically the idea is, you only have about 30 items of clothing total, but they are all able to mix and match with each other to create hundreds of different looks.

A lot of the capsule wardrobes I had seen before looked something like this:


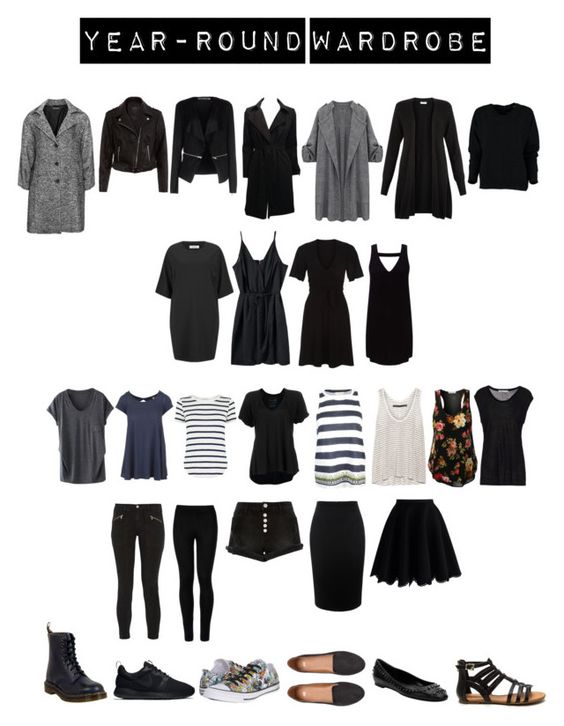
Very cute and classic, a lot of black and white and basic pieces. That is awesome for keeping things versatile and able to mix and match, but I knew I would never own a wardrobe like this. It's just not my style. Almost everything I own has a print or a bright color, and that's just what I gravitate toward in the store.

My friend Amy and I are ALWAYS chatting about clothes, and she happened to mention this idea for a colorful capsule wardrobe she had seen over at Studio DIY. Oh ok, I thought...maybe this is something I can do! This is a VERY bright and happy way to do it!

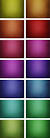
So this got my wheels turning. I decided to pick a color scheme (like they did at Studio DIY). It's just starting to be fall weather out, and the trend for fall seems to be jewel tones. Plus I find jewel tones to be most flattering on me anyway. Here's an example of jewel tones:
I wanted to keep my color palette broad enough for me to not feel bored, but small enough for me to still be able to interchange pieces. I also knew I needed to add more mixable separates in my closet, not just full length dresses.

So I did some organizing of my closet. I sold a bunch of things that didn't go with the flow, kept the things that did, and bought a few new pieces with the money I made from selling old clothes. I probably have 30-40 items now (dresses,shirts, skirts,shoes,scarves,etc) that all can flow together. I wanted to show you guys those items, but I quickly realized, if I showed all the outfits I could make with my whole closet, it would take me FOREVER. Seriously.


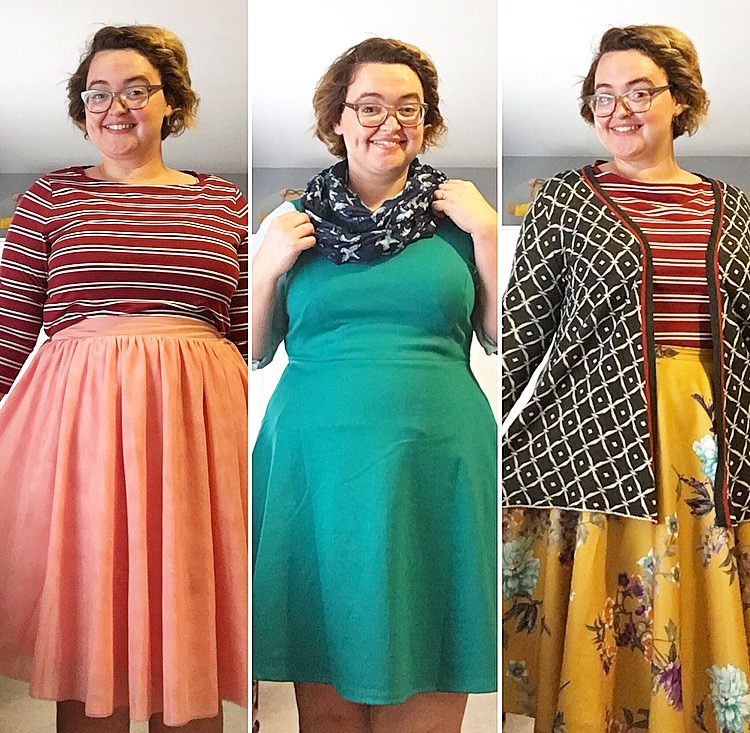
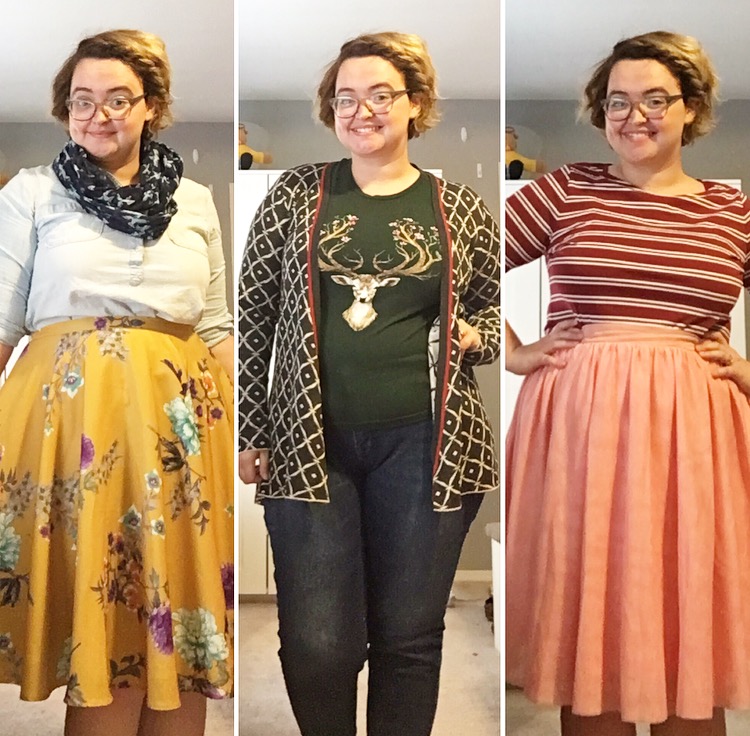
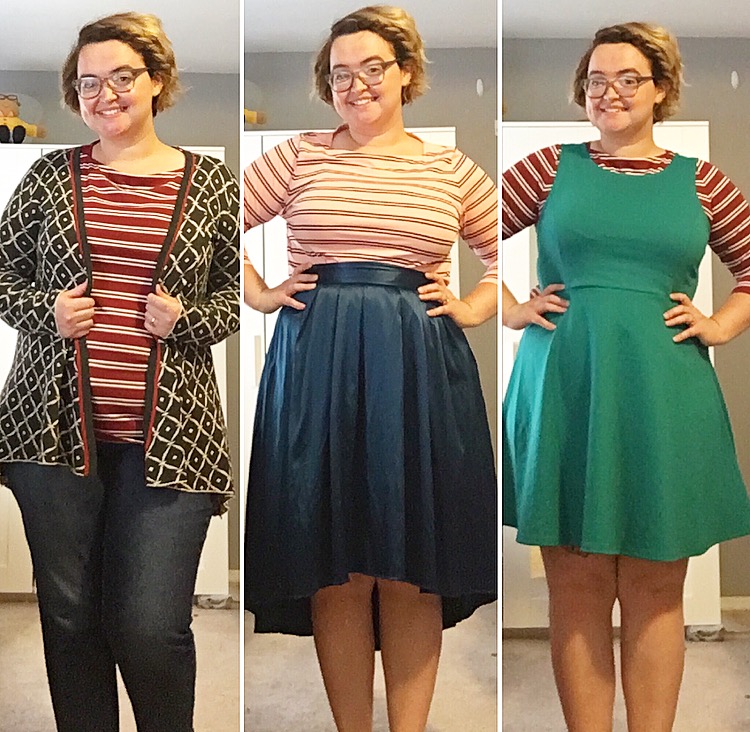
So instead of showing you my entire wardrobe, I decided to take 13 separate pieces and turn them into as many outfits as I could. Even with only 13 pieces, at one point I thought "this is taking so long!! The possibilities are endless!" When was the last time your closet felt like it was full of endless possibilities?


A few notes:

-I didn't use any shoes in this post. For two reasons: It was hard to get shoes in the shot with the DIY tripod I used (a recycled toilet paper roll). And also because just changing outfits this many times took quite awhile. Putting on and taking off shoes and boots would've taken me even longer.


-I used 4 shirts, 2 dresses, 1 jacket, 3 skirts, 2 scarves, and 1 pair of jeans to make these ensembles. I accidentally repeated 1 outfit because I'm not a very organized person. Sorry, I didn't notice it until I'd spliced all the pictures together. And there's just no going back now!!

-You may be able to see an Arthur doll on top of my closet in the background. Don't worry about it.

 So here is just the beginning of what you can do with 13 pieces of clothing in your fall wardrobe!


I'm convinced that if I had kept going (and had been writing things down so as not to repeat outfits) I could've assembled a full month's worth of outfits, where I would not repeat an entire outfit once. And like I told you, I have about twice as much clothing as what you're seeing here. Imagine how many outfits I could make with all of that!

I hope you feel inspired to start your own capsule wardrobe! All of this stuff was pretty inexpensive, and I'd be happy to tell you where I got things if you're interested! But if you do make a capsule wardrobe, chances are it will look completely different from mine.... and that's the idea!


Monday, September 26, 2016

How to Make This Apple Pie (It's Easy!)


Everyone likes to bring a special dish to a party that people will rave about. This pie always makes a big impression wherever I've taken it, but it's honestly so much easier than it looks! And you can make it pretty quickly if you know the best order in which to do things, and how to cut a few corners along the way.

 I'm going to give you all of my secrets!!

Step 1

Cut 6 apples. Chopping them up is my least favorite part (I hate repetitive actions), so it's nice for me to get it out of the way first thing. Plus, doing them now will keep our order of operations flowing nicely. You'll see! 

To cut my apples, I cut off their tops and bottoms (to make them flat) and then peel them with a vegetable peeler. Then I cut each apple into four pieces (avoiding the core), and and cut each piece lengthwise into apple slices. Hopefully the pictures help explain how I did this. You could core your apples first, but this is faster!!


Step 2
Making the filling!


Collect all of your apple slices into a large, deep skillet. The key to making the apple slices bend like flower petals is to cook all of the ingredients of your filling together first. I think you could really use ANY apple pie filling recipe here, but I like to make mine using:
  • 1/4 cup sugar
  • 1/4 cup brown sugar 
  • lemon juice, to taste (I used bottled) , approx 1 Tbsp?
  • spices to taste*
(*The spices you use really depend on your personal preference. Typically apple pie recipes call for cinnamon, nutmeg, ginger, cloves, etc. But if you don't already own all of those, it's pretty expensive to buy each spice separately. Save yourself time and money and just buy pumpkin spice-it's in the spice aisle with all the others. There is no pumpkin in pumpkin spice. Pumpkin spice is just a blend of cinnamon, nutmeg, ginger, and allspice.)


So I just combine all of those ingredients in my skillet, over low/medium heat, (covered with a lid), stirring occasionally to make sure nothing burns. Be careful, it'll be steamy when you open the lid! Cook the apples until they are bendy, about 7-10 minutes. While I'm waiting for them to cook, I make my easy pie crust!


Step 3

This is the easiest way to make homemade pie crust. FOR REALZIES.

I guess you could use a store-bought pie crust here and save even more time, but PLEEEEEASE try this instead. I promise it's so much better and not at all difficult.

In a food processor, combine:
  • 1 stick of butter, cold and cubed
  • 1 cup of flour
  • 1/2 Tbsp sugar
  • pinch of salt
Now pulse this mixture until all the butter is completely broken up and blended into your dry ingredients. Then I add (with the food processor going):


  • a little squirt of the same bottled lemon juice I used in the filling, for flavor
  • just enough ice water to make the dough form into a ball, seen below. Add the water slowly and give it time to combine before adding more! I probably only use a couple of Tablespoons total. 

Step 4

 Now brace yourself....we are NOT going to roll out our crust. There is an easier and less-messy way to do this!


If you guys are interested, I will do a tutorial on fancy pie crusts later on, but today we're keeping it simple. All you have to do is throw your ball of dough into your pie dish and then spread it out with your fingers. That's seriously it, you guys. Make sure you spread it out evenly and that there aren't any gaps. Then put your crust/pie dish in the freezer.


Step 5
 At this point, my apples were cooked.  And they smell sooooo friggin good.


Right away, I dump the cooked apples into a strainer that I had placed over a heat-safe bowl. We want to save all of those extra juices for later!


Your apple slices now need some time to cool off before you touch them, maybe about 15 minutes. Stir them occasionally to make sure all of the heat is escaping and not getting trapped. I used this extra time to wash all of dishes, so they weren't waiting for me later. That's always such a bummer. I also preheated my oven to 350 degrees during this time.

Step 6

Take your pie crust out of the freezer. It'll be pretty solid now, which is perfect. That way, your crust is less likely to overbake in the oven, and these warm apples aren't going to melt your crust while you work!

Now, moving in a circle, from the outside in, put your apple slices in the crust. I took a few progress photos to show, but it's really pretty simple.


Step 7
 Bake your pie for about an hour. I took a shower and watched TV during this time. This recipe doesn't require babysitting.

Remember those juices we saved from before? As soon as you take your pie out of the oven, pour that juice over the apples, making sure it gets in all the nooks and crannies. If we had kept the juice in the pie while baking, your crust would get soggy. Instead, now you have a juicy filling and a crusty crust!The way it's supposed to be!!!


Step 8
Wait a little while for it to cool, and then cut yourself a slice! Ice cream is recommended, but not necessary. This pie is good enough on its own! And makes a fab breakfast IF you're lucky enough to have leftovers!


Saturday, September 24, 2016

Strange Folk Festival

It's become a tradition for me to attend Strange Folk Festival every year. If you don't know about the festival yet, it's basically a HUGE craft fair that just keeps getting bigger and better. And I always end up buying lots of things!


Bryan and I went today. It's open til 6pm tonight, but you could also drop by there tomorrow from 10am-6pm. This year it's being held in the Lafayette Square neighborhood, which is one of the dreamiest neighborhoods in the STL area.


Now, the bad news is, parking was difficult. We lucked out with a good spot after driving around awhile, but that wasn't the case for many. The good news is.....look at all of these amazing things!


I got this OBVIOUSLY WONDERFUL Homer Simpson embroidery piece from a vendor under the name of "Doll Teeth". I tried to locate her Etsy shop, but Googling "doll teeth" has retrieved some strange results. I advise you go out and see her work though! Hand embroidery is such a labor of love, especially when Homer is involved.

 I also got a few new things to add to my denim jacket. Like this yummy-looking ice cream patch from Creature Type.


She is always one of my favorite sellers at Strange Folk, because she and I love so many of the same things. Here's a link to her Etsy shop, if you can't make it out to the festival: https://www.etsy.com/shop/sockie

You can also buy her beautiful coloring book for grown-ups on Amazon by clicking here: Boss Babes Coloring Book


I'm  in love with these pins from Daily Disco. Their booth was the cutest ever and they have an Etsy shop too! These pins were 3 for $7, which I thought was a great deal!

 https://www.etsy.com/shop/TheDailyDisco

I wasn't feeling super hungry when we went (because I had just downed a large pumpkin spice latte on the way there.....and yeah I know it's 90 degrees out, leave me alone), so I just went for a homemade pop tart from Whisk, a cute bakery located on Cherokee Street. Anytime I've gone in the actual shop, they've been out of pop tarts, so I'm glad I got to try one today. I tried Apple Cinnamon, because the only other choice was Pumpkin Spice, and I thought I might turn into a pumpkin if I chose to ingest any more of that today.


My boss at Circa Boutique also has a booth at Strange Folk this weekend. She makes jewelry under the name "Mellow Mountain". All of her stuff is so unique and often nature-inspired. You can also stop by either of the Circa locations (Edwardsville or Belleville) to see lots of other jewelry from her or to request custom pieces. Both locations are open Monday through Saturday.


Here's a cake dome that I spotted at a booth that was selling all vintage goods. Bryan said I absolutely did not need it, and he was most likely correct.


I was having a really difficult time deciding what to wear today, because it was super hot out but I still wanted to wear something cute. I opted for my ombre tunic (from Circa Boutique), my glass pendant necklace (a gift from a very dear friend), my hand painted cherry blossom jeans, and my Dolly Parton tote bag (made by the wonderful MoreMeKnow, who is also a vendor at Strange Folk this weekend). The tote bag ended up being a very good choice, because some of the sellers don't provide bags with purchase.


So all in all, we had a really fun time. I was sweating a lot by the end of it, but hey, we were probably releasing a bunch of poisonous toxins or something. Go out and experience the Strange Folk Festival this weekend!

Friday, September 23, 2016

TV Shows I Have Loved and Lost

It's officially fall as of yesterday, which means it's time for a whole new season of television! I'm here to tell you, if you are lucky enough to find a new TV show that you love, don't get your hopes up. They'll only break your heart.

Cheery start to the post, right?

Ok, not all new shows are going to get canceled, but I seem to have a knack for loving the ones that do. So here's a short list of the shows that I loved and lost, and why I think it was totally unfair. 

1. Best Friends Forever, NBC

This show was THE CUTEST. It's a story of two very funny best friends (on-screen and in real life). Jessica's (the blonde friend) husband has just decided to divorce her, so her BFF Lennon (the brunette) invites Jessica to come live with her and her boyfriend. As a pro reviewer would say "Hilarity ensues!"

The writing of this was DEFINITELY inspired by the Gilmore Girls, so if that show is your jam (it is mine), you would've loved it..These hilarious ladies started a new show (after BFF was canceled) called "Playing House" on the USA network. Last I checked, it was still being made, but I don't have cable and I'm not usually a pay-per-episode kind of gal.

2. Mind Games, ABC

No one seems to remember this show but me, so if you do, I will be so friggin' pumped. I just looked it up, and it was literally only on the air for one month in 2014. And yet I am still in mourning.

I initially started watching this show because Steve Zahn is AMAZING. If you don't recognize Steve, he was Lenny (the really funny guy) in "That Thing You Do", George in "You've Got Mail" (an employee of The Shop Around the Corner), and Ray (Beverly's drug-using husband) in "Riding in Cars with Boys". PLUS LITERALLY A BAZILLION OTHER THINGS. And he is one of my all-time faves.

So the show centers around him and his brother (Christian Slater-weird, but whatever) starting a business, helping clients with their problems by using mind manipulation. Christian Slater is focused on making money and having a successful company. Steve Zahn's character is much less professionally minded, but he is vital to the company because he is the talent. He knows how to read people and how to alter their way of thinking using psychological techniques. It's hard to describe, but I guess the closest comparison would be kind of like Sherlock. You've got the crazy smart genius (Sherlock/Steve Zahn) and then the companion who knows how to keep them employed by using the genius's talents (John Watson/Christian Slater).

Unfortunately, the last episode ended with Steve Zahn's character getting in a car crash, and then the screen goes black. So, yeah, I guess that's it.

3. Super Fun Night, ABC


Hey, remember when Rebel Wilson had her own cute little TV show and it was really funny? I do!

It was an awesome cast of characters, featuring Lauren Ash (who is now playing Dina on Superstore, which I am pretty happy about), and Rebel Wilson's love interest is the guy who once played the little kid in Muppet Treasure Island. Not sure if he would like that being his claim to fame, but....hey, I like the Muppets.

 The plot line is a little flimsy. It's just about three room mates,having fun together, and I think Rebel Wilson is also a lawyer for some reason. But I loved it. And no one can deliver a joke quite like Rebel does.

Muppet Treasure Island photo, for important reference reasons.


So....do you guys remember any of these shows? Or do you have a list of your own dearly beloved TV shows? Tell me about them! I want to know!

Tuesday, September 20, 2016

Guess Who's Back? Back Again? Plus A FREE PAPER DOLL!


Hey guys, remember when I used to blog regularly? And then just totally stopped? What was up with that?

Wellllllllll, what had happened was.....

Last year around this time, I came down with some sort of cold/flu/sinus thing. Not a big deal. I would work during the day and get through it (with DayQuil and gross cough drops.....yuck, I can almost taste them now) but by the time I would get home I felt completely DRAINED. So I would go home and lay down every day, trying to rest and heal between work days. This lasted a few weeks.

Well apparently, laying down to rest every night after work was a bad idea, because all of those cold/sinusy fluids (sorry, gross) got all backed up in my lungs. By the time I finally realized I was VERY SICK and needed to go to the doctor (Halloween Day), they said I wasn't breathing well because I had pneumonia in both of my lungs. Long story short, I stayed in the hospital for almost a week (SUCH a long story about why it took so long), and it was still awhile after that before I felt like a human again.

By the time I felt better, I was like, "What can I even blog about? I haven't done anything/gone anywhere/ thought about anything but trying to breathe in like a month".

I mean, sure, I could've given you a review of hospital food, but who wants that? Side note: I learned that the way around eating actual "hospital food" is to order chicken strips for every meal, They come in frozen obviously, so there's nothing hospital-y about them. And I've never been too good for frozen chicken strips, know what I mean? Basically, chicken strips nursed me back to health.

ALL THIS TO SAY, if it's cool with you, I'd still like to blog every now and then. And I'd love to never have pneumonia again. And here's a free Mindy Kaling paper doll/coloring page, because you've earned it by reading this lengthy post.


Tuesday, October 20, 2015

Rainbow Marshmallows

So yesterday I was browsing through Instagram, and I happened upon a post by Studio DIY for home made tie-dye marshmallows. If you haven't checked out their website before, I highly recommend giving it a look. They've got so many fun ideas for projects. costumes, recipes and more!

When I first saw their marshmallow pictures I thought, "those are STUNNING!!!"

I also thought, "that looks difficult and messy".

......Turns out, I was right on all accounts!


I had promised you guys some no-bake recipes during October, and while this one is difficult, there isn't any actual baking involved! I decided to do mine in pink, orange, green and purple because the colors reminded me of the Day of the Dead skulls from my last post!

I won't go into too much detail on the recipe itself, since I posted the original link at the top of this post, but I will tell you what you need to know if you decide to do these for yourself!

Here's what mine looked like before they were cut:

And after:


The process of making home made rainbow marshmallows is a messy one. You'll need multiple small bowls and spoons/spatulas for each color, an electric mixer, and a candy thermometer.

You could do any colors you want. The original recipe calls for gel food coloring, so try to stay away from the liquid kind. It might throw off the consistency of your mallows. Sometimes gel food coloring can be a little high-priced at the craft stores, so I used this pack from Betty Crocker. You can get it at most regular chain supermarkets.


When you are whipping up your marshmallows in your mixer, make sure to have the speed set to HIGH like it says in the recipe. I had it on MEDIUM because I didn't want the mixture to slosh everywhere, but it took a lot longer for it to mix that way. Just be careful, because the liquid inside the bowl will be very hot!

When the marshmallows are all set and you're ready to eat them, you can roll them in powdered sugar to make them less sticky. I saved that part for after I took the pictures though, because I wanted the colors to show nice and bright.

(I hope I haven't given anyone permanent eye damage. But if I did, you're welcome to come over and eat one of my rainbow marshmallows as compensation for your trouble)


Monday, October 19, 2015

Day of The Dead Calaveras

Fear not, friends. I haven't stopped blogging. I just needed to step away for a week. Not only was I making LOTS of treats for my friends' wedding all of last week, but Bryan also went on a surprise work trip to Oklahoma AND I was starting a new job! So I just decided to focus on the tasks at hand. But I'm back now, and I've got something really neat to share with you today!

(GET READY FOR LOTS OF PHOTOS)

My friend Erica is an amazing artist and she loves a good DIY project as much as I do! I was SO jazzed when she invited me over to her house to decorate these Day of the Dead sugar skulls (aka calaveras). Erica explained The Day of the Dead to me as a Mexican holiday  that celebrates the lives of loved ones who have passed away. I have never celebrated it before, but I think there is something so beautiful about remembering and honoring relatives, and not letting them be forgotten.


Erica made these sugar skull parts in advance by using a mixture of ultra fine baker's sugar, meringue powder, a little bit of water and some skull molds that she found here: Mexican Sugar Skull Website
(That's also where she got the exact recipe for them!)

After they had hardened and set, I came over to help decorate! Erica made a large batch of royal icing (that recipe can also be found on the Mexican Sugar Skull website) and we got to work. Step one was to "glue" the front and back pieces of the skull together with icing.


After the skulls were fully assembled, we separated the rest of the royal icing into small bowls and made our colors bright and beautiful!


Then we put our brightly colored icings into small ziploc bags ASAP, which both kept the icing from drying out and served as our piping bags.


We did end up using a frosting tip with a couple of the bags, but for most of them, we just cut a small part of the corner of the bag and frosted!

Honestly, the scariest part was applying the first bit of frosting to the skulls. Erica had made the skulls look so flawless and I didn't want to ruin them with messy icing! So before we started, we looked on Pinterest for some inspiration.


Erica also had glitter, sequins, and shiny foil available for us to embellish them! I think they really put our skulls over the top.....in a good way!!! Here are some close-ups of a few of our beauties:


In Mexico, they often write the names of their loved ones on the foreheads of the sugar skulls, as Erica did in the ones above. The earrings on the second one were such a beautiful touch. All of the skulls she made were so intricate and detailed.

The two below were a couple of mine:


We learned a lot while making these, and if you're thinking of trying it, we would be happy to share some of our new found wisdom. Here's a few of our most important tips:

- Making them beautiful will take time. We probably spent 20-30 minutes on each skull. But it's a great way to spend the afternoon with a friend. We had so much fun!

- More is More! Usually less is supposed to be more, but with these sugar skulls that is not the case! You can keep adding on more designs and flowers and sparkles, and they only seem to get prettier. It's also pretty easy to hide any mistakes you might've made this way, so don't ever think that it's ruined.

- The Icing Dries Quickly. It's important to keep your icings sealed in plastic bags or covered with a wet paper towel. They will be pretty impossible to use if they dry out.

- Steady Hands are a Plus. There's a chance I may have downed three cups of coffee while making these. And it made my hands pretty shaky. I don't regret the coffee, but I will say that it made things more difficult. If you want your skulls to look nice and symmetrical, shaky hands will not be your friend.

Here's the whole gang, all finished up!


We were both so pleased with the outcome. Personally, I can't remember the last time I was able to do a craft project solely for the purpose of fun and enjoyment, and it was seriously such a great time.